
Orientation
Grades 7-12
Welcome to the Airport Design Challenge! Before you fly, we want to help you get ready. On this page, you’ll find an overview of what will happen, a simple schedule, helpful tips, and what to expect as you get started.
Take a few moments to review the information below to learn more about the program and how to move through each part of the challenge.
Aviation is an exciting field that has grown significantly since the Wright Brothers first flew an airplane. It keeps changing and improving even today. Pilots, aircraft mechanics, engineers, and many other professions all depend on airports. Without airports, planes wouldn’t have a safe place to take off or land.
Over the next few weeks, you will work alone or in small groups and learn from FAA Airport Design Challenge staff about the important parts of an airport. You’ll find out how airports are planned, built, and used. After you learn this, you will research a local airport and then build a model of that airport in Minecraft.
As you prepare to learn and develop your airport, we expect you to have a few questions:
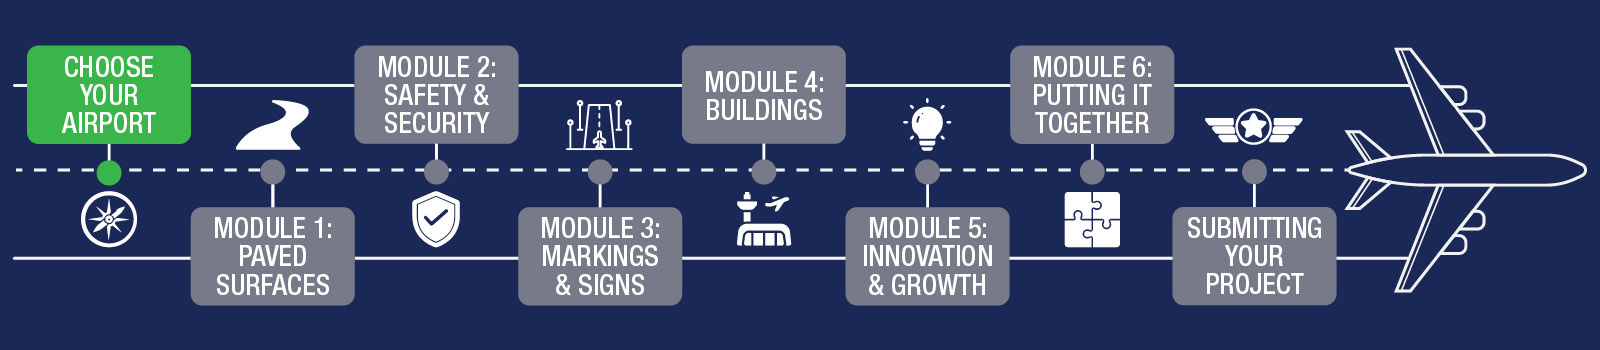
Once you finish this orientation, you’ll get to choose which airport you want to work on. After that, you’ll go through six learning modules before turning in your final project. This course is set up so you can work at your own speed. Most students complete one module every one to two weeks, but you can go faster or slower if needed.
It’s important to do the modules in the right order to help you learn as much as possible and do well on your project. Below, you’ll find the suggested schedule for the program. You can use it as a checklist.
Airports can be much bigger and more complicated than you might think. When you look at airports near where you live, you’ll need to decide whether to choose a smaller airport, which may allow you to add more detailed features, or a larger airport, which may require more work and careful planning to model accurately.
After you choose your airport, use the Internet, Google Earth, and other tools to learn about its size and layout. Find out how the airport works and what things you’ll need to include when you build your model.
Each module comes with instructions and learning aids to help you. It is very important that you read the Lesson Guides and visit each link we provide to gain a strong understanding of each airport principle. That information will be critical to your success in building details into your design. At the end of each module, you will complete a short Knowledge Check Quiz.
You are not on your own! You have parents, teachers, and friends to assist you. We will also introduce you to FAA Mentors whose job is to answer your questions and give you constructive guidance along the way. You can reach out to our mentor team as often as you like by emailing avsed.challenge@faa.gov – make sure you CC a parent, guardian, or teacher on your emails.
Another way (perhaps the coolest way) for you to get help is to contact the Airport Manager of your local airport. Most airports will be happy to give a complete tour, share information about the airport's history and future growth, and answer any questions you have along the way (visit AirNav.com to find your airport's manager).
We sincerely hope that you enjoy this opportunity to learn a small part about your local airport, how it is developed, and how it can grow in the years ahead. Exercise creativity and be mindful of the small details that will make your final product stand out above the others. Wilbur Wright once said, “It is possible to fly without motors, but not without knowledge and skill.” During this challenge, we will provide you with the knowledge, you will develop your skills, and together you will bring your airport to life.
We have Minecraft tutorial videos available to help you get started. Find a playlist of helpful tutorial videos and another video explaining how to purchase or access a Minecraft license. Be sure to review the tutorials so you get off on the right foot. As always, reach out to avsed.challenge@faa.gov with any questions you may have.
What are the judges looking for? How do I achieve a good score? What are some common mistakes?
Below is the rubric we will use to score your airport:
Airport Design Challenge Rubric
| Score Range | Technical Accuracy | Creativity | Innovation | Final Presentation |
|---|---|---|---|---|
| 0-5 | Completely inaccurate dimensions or scale. Missing major elements. | Terrain is flat and does not reflect the environment of the students’ home. Airport components show minimal creative effort. | No innovative technology/ concepts provided on the airport. | Presentation fails to demonstrate any of the airport’s functions, size, history, etc. |
| 6-10 | Some items are dimensionally correct or to scale. Missing minor elements. | Terrain is present but generic. Airport components show some design and creativity in both design and decoration. | Some innovative technology/ concepts included on the airport; not easily identifiable | 5 minutes long (+/- 3 minutes), little or no narration/subtitles, minimal view of airport components. |
| 11-15 | Most items are dimensionally correct and to scale. All required elements are present. | Terrain accurately reflects the students’ home environment. Airport components are easily identifiable. | Some innovative technology/ concepts included on the airport may not fit into the airport layout and function. | 5 minutes long (+/- 2 minutes), provides narration or subtitles, shows more than 50% of the airport but may not describe factors like operation, history, and functions of airport components. |
| 16-20 | All items are present, dimensionally correct and to scale. | Terrain and all airport components reflect a high level of creativity and attention to detail. | Innovative technology/ concepts are appropriately used across the airport and are very apparent. | 5 minutes long (+/- 1 minute), is narrated, creative, and adequately provides the viewer with a full range perspective of the airport. |
What our judges have said about scoring projects:
“Common mistakes that we see in videos are when students don’t follow the instructions! There are different criteria for judging and points assigned so it’s important to pay attention to that!”
“My favorite projects are the ones where everything is to scale. When you can look at an aerial view of the airport and see the Minecraft project and they look almost identical, it’s amazing!”
You may participate either:
- As an individual
- As a group*
NOTE: Groups can have no more than five members.
*If you're working as a group, you will collaborate throughout the program. Stay in touch with your group and try to complete modules at the same time. Brainstorm, work together on your layouts, and share ideas. You will declare your group later in the course. We will talk more about groups later.
Reviewing the Skills Needed for Success
When working in a team, there are some skills that are needed for success – such as teamwork, perseverance, communication, organization, and vision! As individuals, complete the Set Up for Success activity, then review your answers together as a group. That way, you’re ready to soar!
Get Inspired
Take a look at the 2024 winners and learn from the creativity and innovation demonstrated by these student teams.
A Word About Wings...
Pilot wings are small, metallic badges that pilots wear on their uniforms to show their training level and role. You could think of them like a pilot's version of a varsity letter or a rank patch. Everyone starts with a basic set of wings after completing their first major level of flight training. This usually means they've proven they can safely fly and understand core aviation skills. The initial wings show that the person is officially a pilot, even if they're still early in their career.
As pilots gain more knowledge, experience, and complete harder training, their wings can get "fancier." For example, military pilots may earn specialized wings for flying different types of aircraft, like helicopters, cargo planes, or fighter jets. Some pilots also receive upgraded wings for leadership positions, advanced qualifications, or hours of flight time. Airline pilots follow a similar idea: a first officer (copilot) might wear typical wings, while a captain's wings look more detailed or include extra markings. In short, as pilots grow in skill and responsibility, their wings evolve to reflect that journey. It's almost like leveling up in a game, but in real life.
As you progress through ADC, you'll earn your ADC wings! As you finish each module and add elements to your airport, you'll progress through levels and eventually earn the highest level of ADC wings when you turn in your final project! You can find your current wings and progress on the webpage of each module, and on the front page of each workbook.
While your ADC wings won’t qualify you to fly, they do show that you’re qualified as an ADC designer. Take it one step and a time, and we’ll be cheering you on along the way! We can't wait to see what you learn and build!

Next Steps
- Test your knowledge with the Orientation Quiz!
- Then, move on to choosing your airport and take off!
- Follow the six fun lessons, aiming to complete one every 1-2 weeks. Check them off as you go.
Let’s build, learn, and fly together!
Finished with your Workbook and ready to move on? Next up is Choosing Your Airport. You’ll earn your first set of wings when you finish that portion of the Challenge.